This post will describe how this website was created and will be maintained going forward.
Here were my technical requirements for this site:
- Hosted totally in an Amazon S3 Bucket (i.e. no servers/ec2/PaaS cost)
- Free SSL support
- Ease of writing blog posts
After some consideration, I settled on using the following technologies:
- source control: Git/Github
- blogging platform/CMS: jekyll
- DNS: Amazon Route53
- deployment: aws s3 cli bucket sync service
- SSL: free Amazon Cerfificate Management Service Cert securing an Amazon CloudFront distribution (CDN) that sits in front of the s3 bucket
- Google Analytics for analytics/tracking
- Disqus (comment below!) for comments
I will now describe how this is all sewn together.
Building Locally
I will not go into too much detail here because the jekyll docs do a better job. jekyll build && jekyll serve spins up the site and I can access it at localhost:4000
Deployment
The assets of the site all live in an Amazon S3 bucket. I decided that deployment would be done with the following series of commands:
JEKYLL_ENV=production && jekyll build && aws s3 sync _site s3://josephecombs.com/ --profile eb-cli-2
A few notes about the above command:
- you must tell jekyll to build in production mode or else important stuff doesn’t happen that I can’t remember right now.
- jekyll build builds the site into a folder called _site.
- the root S3 bucket is a bucket named josephecombs.com
--profile eb-cli-2is a way to tell the aws s3 sync command which set of AWS credentials to use on your local machine (i.e. I have one profile for my personal AWS and one for my company.) Read more here- aws s3 sync is a command that syncs a directory on your computer, to an S3 bucket. Because _site has everything you need for your site, this works well. Read more about the AWS CLI here
Configuration of the S3 bucket
Create a bucket named as the root TLD (NOT www.); in my case the bucket name is josephecombs.com
Turn on static website hosting in AWS S3:
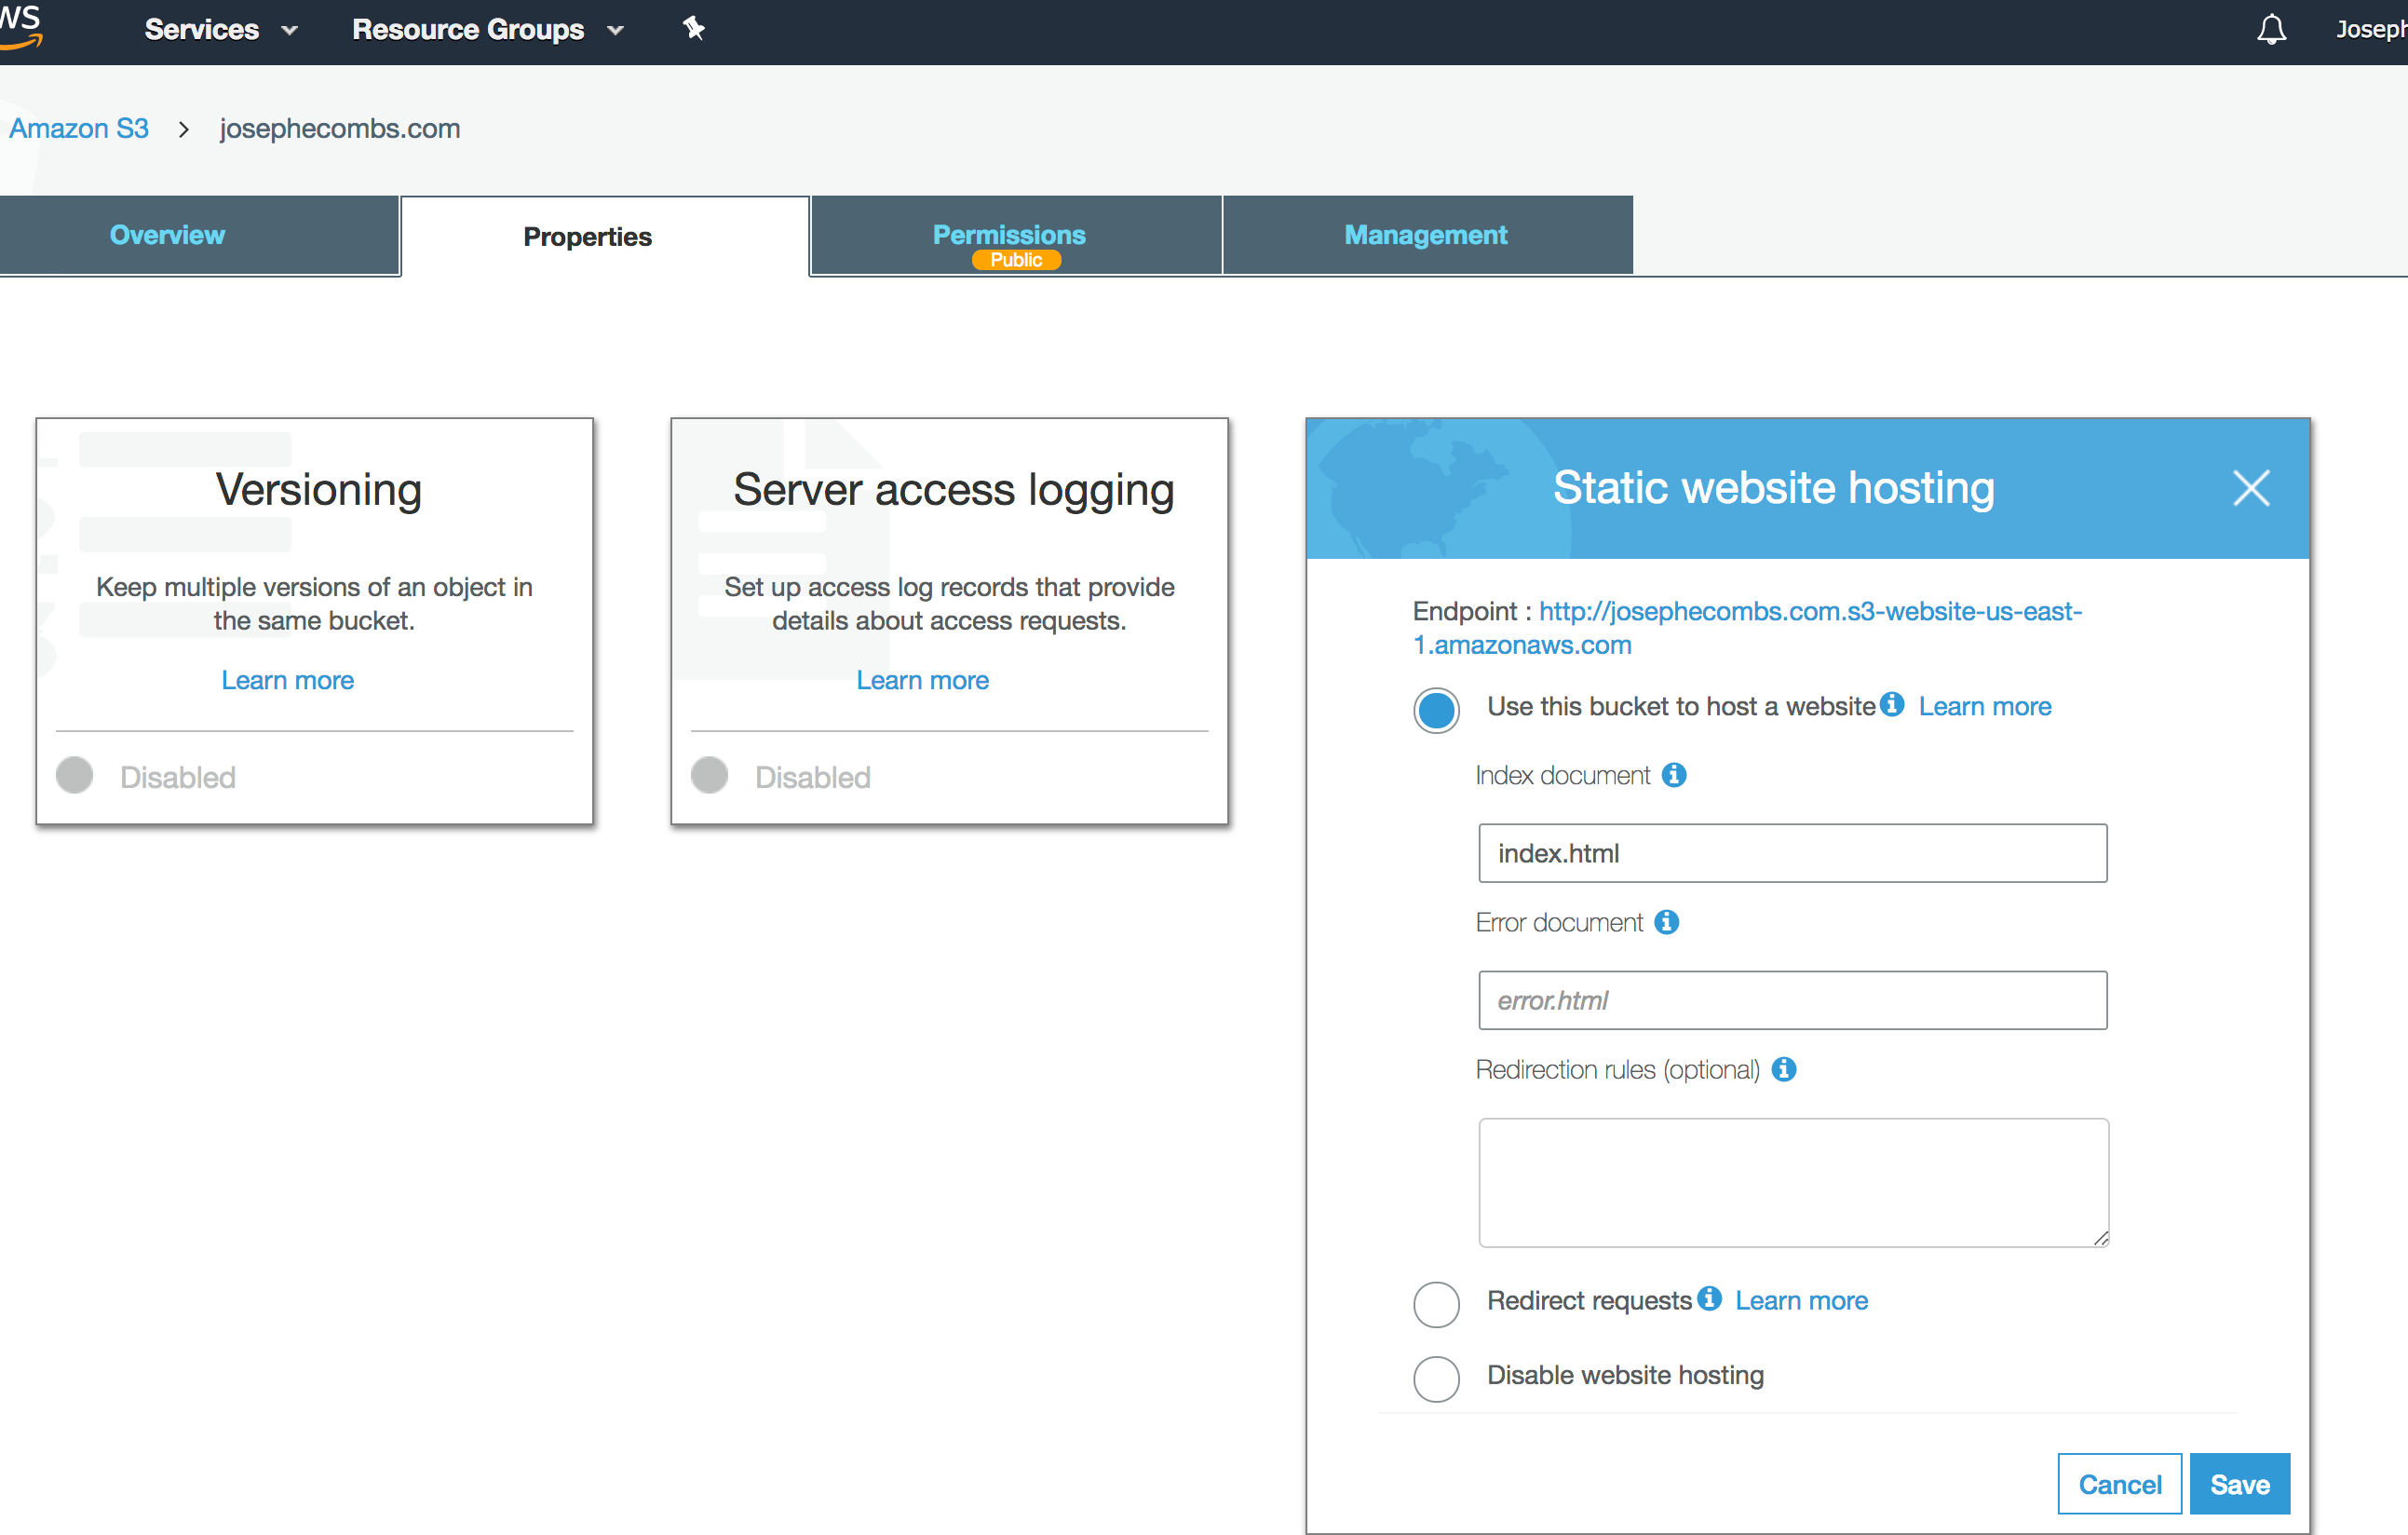
attach this policy to the bucket (do this on the “Permissions” tab in the screenshot above), substituting in the correct bucket name for your site. This policy allows anyone to read anything from this bucket. Be sure to not publish any sensitive data in this bucket!:
{
   "Version": "2008-10-17",
   "Statement": [
       {
           "Sid": "PublicReadGetObject",
           "Effect": "Allow",
           "Principal": {
               "AWS": "*"
           },
           "Action": "s3:GetObject",
           "Resource": "arn:aws:s3:::josephecombs.com/*"
       }
   ]
}
Stop at this step to make sure that your website is being served at the s3 URL.
DNS
I recommend just registering the domain using Route 53. There are probably slightly cheaper options available, but doing it this way will make the cloudfront/ssl step easy. Here’s how my DNS is configured for the hosted zone josephecombs.com: (take note of the aliases to the cloudfront endpoint, we will get to that soon:)
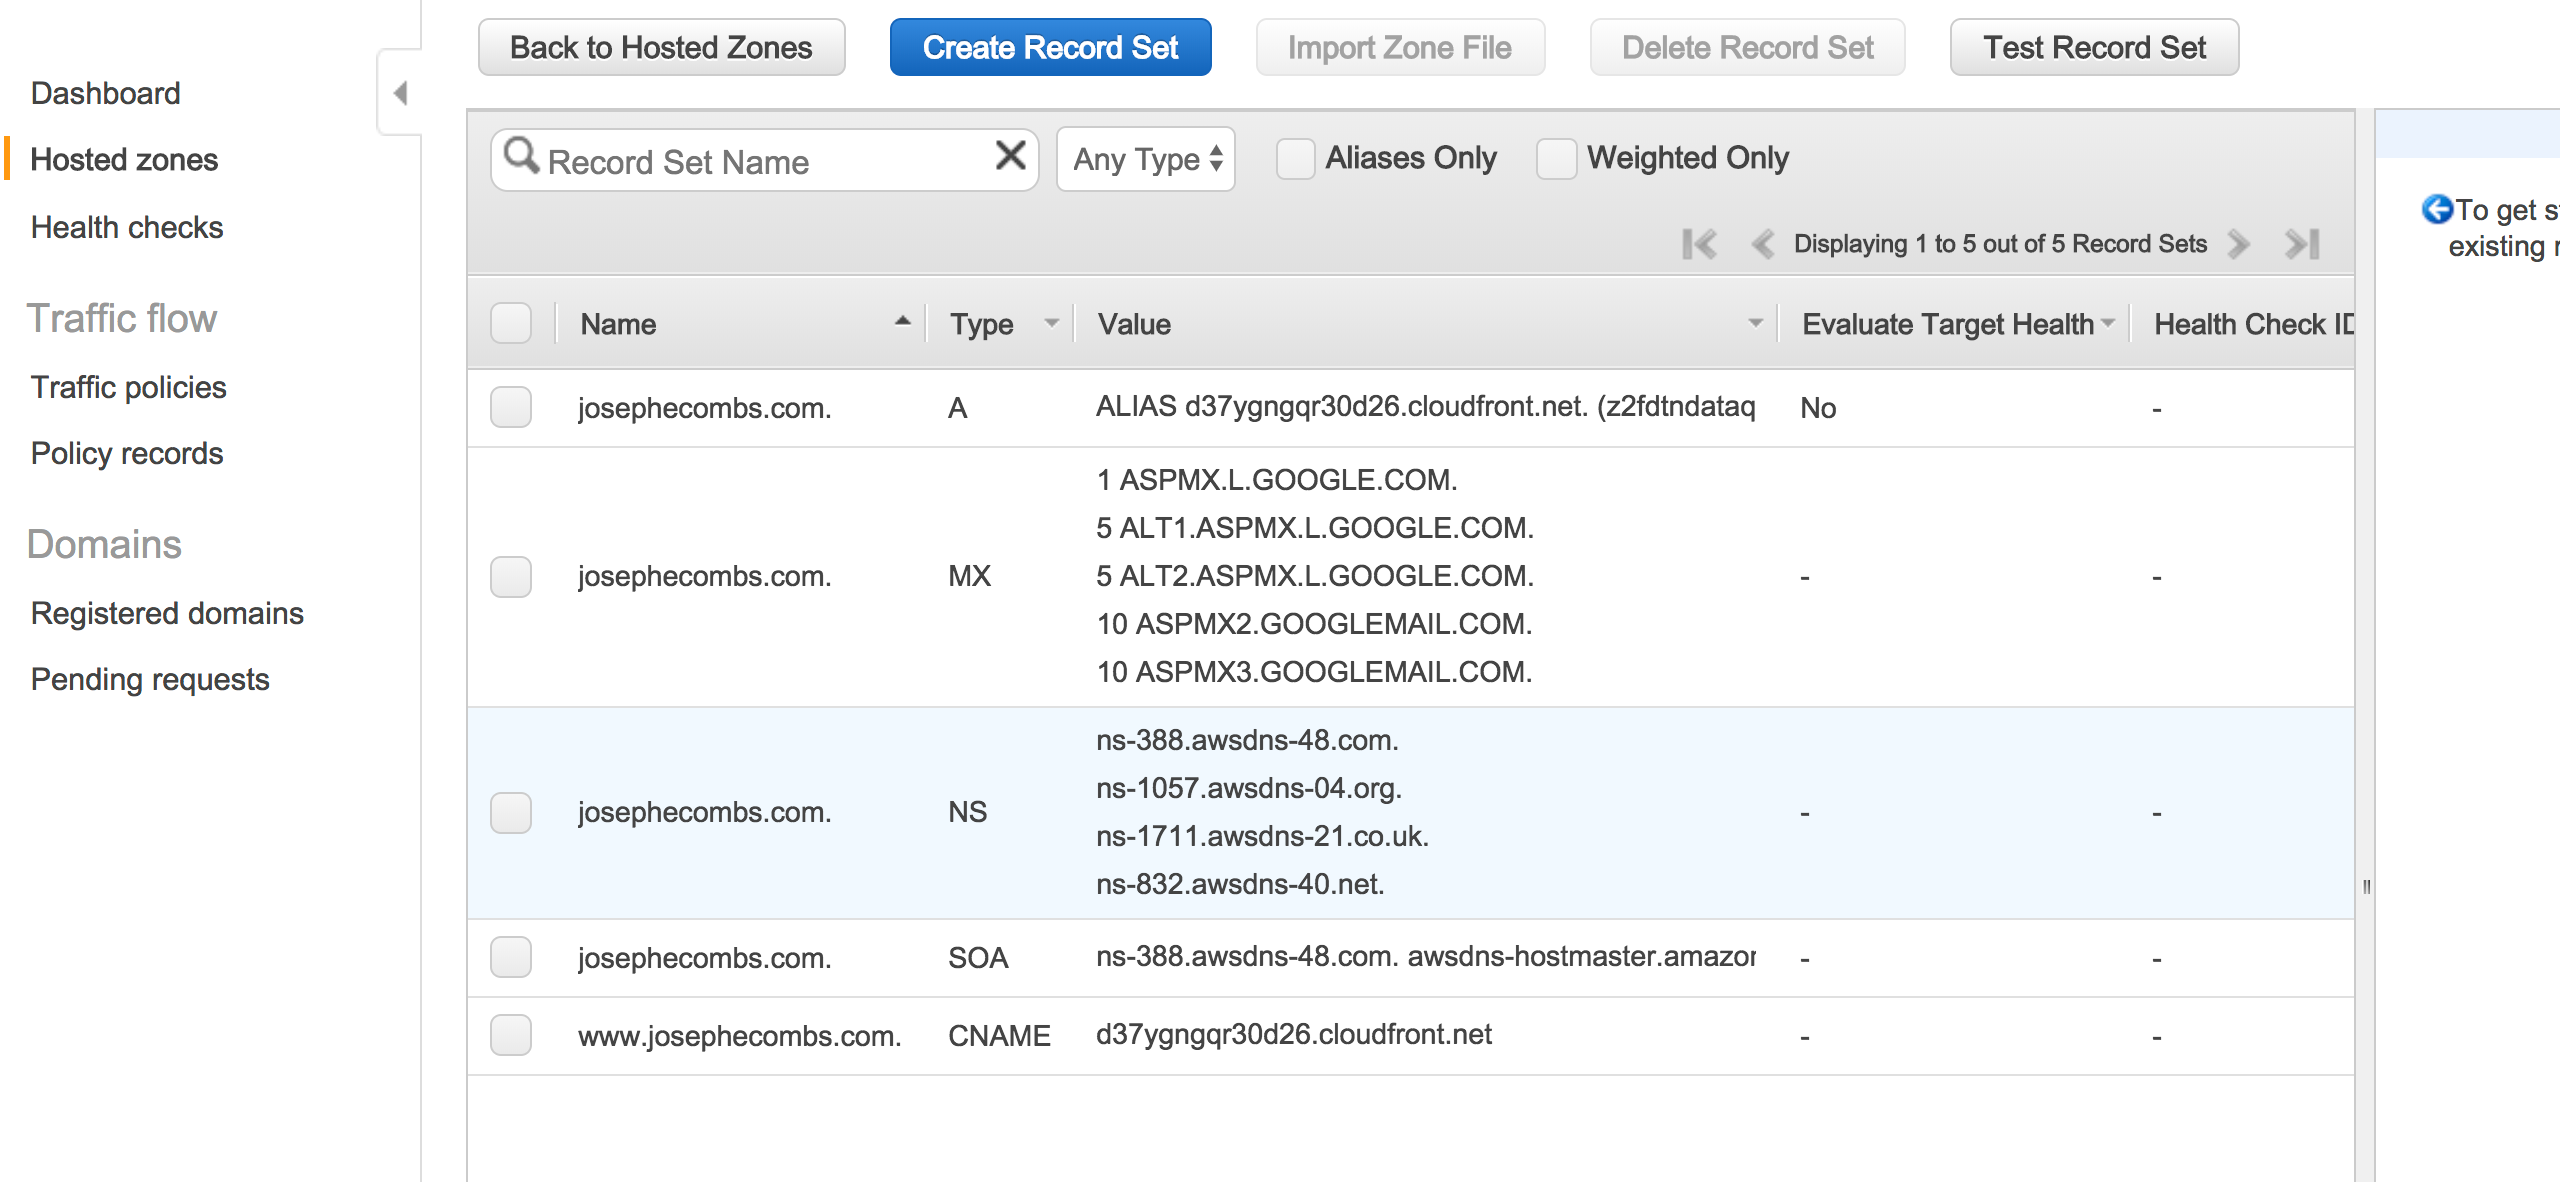
Ignore the MX records, those give me GMail and vanity email. I may do something else there soon because I pay $5/month for a Google Apps seat license and I feel that is not a good value. Also, the NS and SOA entries are created when you create the hosted zone.
Request the correct cert
Request an SSL cert securing both *.yourdomainname.com and yourdomainname.com. YOU MUST DO THIS IN THE REGION US-EAST-1 IN ORDER TO SECURE THE CLOUDFRONT DISTRIBUTION YOU WILL CREATE LATER. If you’ve registered your domain through Route53, Amazon gives you a one-click validation method to prove that you own this domain. Use the Amazon Certificate Manager wizard to do this.
CloudFront
CloudFront is Amazon’s Content Distribution Network service and you can secure a CloudFront distribution with the certificate you created in the previous step.
These are the steps to configure the CloudFront distribution with the wizard in the right way:
- Create Distribution
- Pick “Web”
- “Origin Domain Name” should be the endpoint listed in the S3 static website hosting step, in my case it is josephecombs.com.s3-website-us-east-1.amazonaws.com
- I’d pick the Viewer Protocol Policy that redirects HTTP to HTTPS.
- for Alternate Domain Names (CNAMEs), enter
yourdomainname.comandwww.yourdomainname.com - For “SSL Certificate”, you should see the certificate created in the previous step, select that.
- Leave the other defaults in place.
- Click “Create Distribution”
- After the Distribution is live (it takes a few minutes), you SHOULD be able to see your static website served at (in my example) http://d37ygngqr30d26.cloudfront.net/
Final Step
Take the domain name for your CloudFront Distribution (in my case d37ygngqr30d26.cloudfront.net), and enter it in the A and CNAME records as I have them in the screenshot in the Route53 web client in the DNS step. AWS’ Route 53 web client is strange and it is awkward to make an A Record that is also an alias so don’t get discouraged like I did!
There you have it! Your static website should be served over SSL and cost very little to serve.
Advanced
There is very good deployment script here to allow you to have pretty urls in your s3 bucket - i.e. allowing you to have urls like /2018/03/05/how-to-make-an-AWS-S3-static-website-with-ssl rather than /2018/03/05/how-to-make-an-AWS-S3-static-website-with-ssl.html. That post also explains how to trigger CloudFront cache invalidation to serve the most recent version of changed files.